| View previous topic :: View next topic |
| Author |
Message |
uSound 


Joined: 24 May 2009
Posts: 1180
Location: Virginia
|
 Posted: Wed Feb 09, 2011 5:22 pm Post subject: ScoreHero Banner Tutorial (for Photoshop) Posted: Wed Feb 09, 2011 5:22 pm Post subject: ScoreHero Banner Tutorial (for Photoshop) |
 |
|
This is just a general guideline for how I make banners. There are many other way of doing this, and I hope this guide helps you out or at least gives you some ideas!
Banner sizes are usually 300px x 40px.
A few bannermakers have dabbled in a 100px x 40px design (for XXX -specific instrument- FCs) and 600px x 80px (for larger, greater accomplishments).
Pick a program that you're used to using. I use Photoshop and the rest of the guide will be geared towards Photoshop. GIMP is an alternative free program that some people like.
Start with a 300px by 40px file, any background color/type is fine.
Border:
1. I like to make the border first, since that rests on top of all of the other layers. Make a new layer, rename it "border".
2. Grab the Rectangular Marquee Tool (  ) and create a marquee across the entire banner. ) and create a marquee across the entire banner.
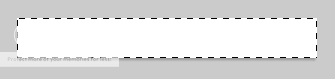
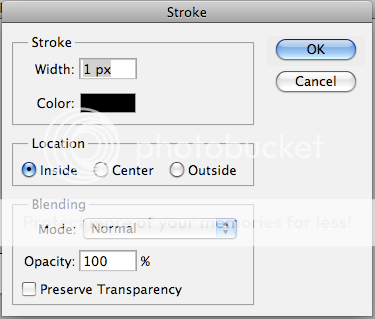
3. Go to Edit > Stroke. You want to make a 1px border, make it black, then check the button for "Inside". You can obviously customize this as you see fit.
Text:
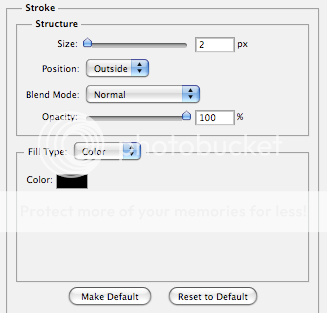
4. Using the Text Tool (  ), you'll be adding text (omg) to the banner. Most people place it snugly in the bottom left of the banner, although people do experiment otherwise. The size will vary depending upon how much text the banner requires. The font can be whatever you see fit although the "standard" is Century Gothic, which was what inv4der used to use. Most people find sans serif fonts to be better across the board. In addition to all of this a stroke and coloring is common as well. To do this, I use Blending Options which is found by right clicking (or double clicking) the layer you want to edit. Check the Stroke box along the side and follow the settings below. ), you'll be adding text (omg) to the banner. Most people place it snugly in the bottom left of the banner, although people do experiment otherwise. The size will vary depending upon how much text the banner requires. The font can be whatever you see fit although the "standard" is Century Gothic, which was what inv4der used to use. Most people find sans serif fonts to be better across the board. In addition to all of this a stroke and coloring is common as well. To do this, I use Blending Options which is found by right clicking (or double clicking) the layer you want to edit. Check the Stroke box along the side and follow the settings below.
Size: 2px
Position: Outside
Color: Black
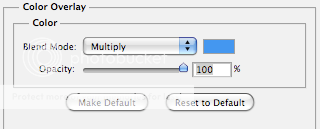
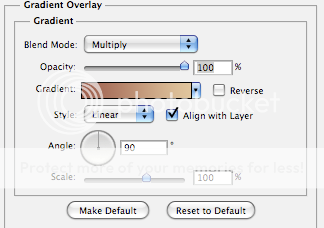
Now to add color. If you want the text to be a solid color, check Color Overlay. If you want two or more colors faded check Gradient Overlay. You can mess around with these settings as much as you want. (If there's a need for a gradient tutorial to be added, let me know.)
Background:
5. Find whatever image you want for your background and copy/paste it in. I would advise on using images that are hi-res to allow for quality when re-sizing. (Google search for specifically large images.) Make sure your background layer is below your border and text layers.
Instrument Icons:
6. Grab the Rock Band instrument icons here. I organized and zipped the files created by other ScoreHero members so you don't have to go running around trying to find them. (Credit to SaikoSakura, One3Se7en & Prong)
7. Open an icon and re-size it with the Move Tool (  ) (Ctrl/Command + T enables Free Transform, this is a default key shortcut), then drag it over to your banner file, and make more re-sizes if necessary (make sure you're holding Shift to ensure proportional re-sizing). My icons are at 34px by 34 px, but that could vary between people slightly. You should probably add all of the icons into the same file for continuity between your banners, and rename them all accordingly for easy access. Make sure that all of these icons are under the border and text layers but above the background layer. ) (Ctrl/Command + T enables Free Transform, this is a default key shortcut), then drag it over to your banner file, and make more re-sizes if necessary (make sure you're holding Shift to ensure proportional re-sizing). My icons are at 34px by 34 px, but that could vary between people slightly. You should probably add all of the icons into the same file for continuity between your banners, and rename them all accordingly for easy access. Make sure that all of these icons are under the border and text layers but above the background layer.
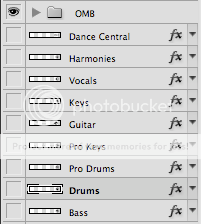
As you can see above, I have a layer set for when I'm working with OMB/FBFC banners. To do this, click the New Group icon at the bottom of the layer palette, then drag in some duplicate layers of the icons. To duplicate layers, drag a layer toward the New Layer icon. If you select each layer in your OMB/FBFC set you can link them by clicking the Link Layers button.

Link Layers = the chain links
New Group = the folder
New Layer = the piece of paper
8. Now to add color. Use Blending Options with Color Overlay or Gradient Overlay again. Make sure that your Blending Mode is set to Multiply for these.
9. You're going to want to save it as a .PSD file to use as a template, and a .PNG file when you want to share it.
If I've forgotten anything (which I'm sure I probably have) or if something isn't clear to you, don't hesitate to let me know!
Last edited by uSound on Tue May 12, 2015 11:40 am; edited 2 times in total |
|
| Back to top |
|
 |
TQSG

Joined: 30 Jul 2008
Posts: 1054
Location: Las Vegas, Nevada
|
| Posted: Wed Feb 09, 2011 9:07 pm Post subject: |
|
|
Very good tutorial uSound. Perfect for anyone getting into banner-making. Though, I don't think you specified the usual icon size, did you? Or are they resized in the zip-file?
Also, would it be okay to edit in my own tutorial for GIMP in my post instead of making another thread?
_________________
|
|
| Back to top |
|
|
uSound
Joined: 24 May 2009
Posts: 1180
Location: Virginia
|
| Posted: Wed Feb 09, 2011 9:15 pm Post subject: |
|
|
No, I didn't give anything about that to give some people more room to make more styles or something. All of the icons are in their un-edited forms. I could give the usual size, I just never measured it out.  A GIMP tutorial would be awesome, I'll link to your post in the OP! A GIMP tutorial would be awesome, I'll link to your post in the OP! |
|
| Back to top |
|
|
11yearoldkid

Joined: 01 Aug 2007
Posts: 1068
Location: Austin, TX
|
| Posted: Wed Feb 09, 2011 10:49 pm Post subject: |
|
|
Amazing guide, Usound. Hopefully this will attract more people and more creativity to the banner making community, then we'll have some truly epic banners.
_________________
| JCirri wrote: | | Matt wrote: | | No, its only 10000. I am going to ban the next person who types THOUSANNNNNNND |
TEN THOUSANNNNNNND! |
My life. |
|
| Back to top |
|
|
Shredin0id


Joined: 03 Jan 2011
Posts: 154
|
| Posted: Thu Feb 10, 2011 12:34 am Post subject: |
|
|
Thanks just what I was looking for! It's also a really nice tutorial! Now I have to find a way to get photoshop. Just out of curiosity... did you see my post asking for this?  Also I'll definitely have to try usound! Also I'll definitely have to try usound!
_________________
|
|
| Back to top |
|
|
iHomer


Joined: 10 Feb 2008
Posts: 935
Location: Vaughan, Ontario, Canada
|
| Posted: Tue Apr 12, 2011 4:41 am Post subject: |
|
|
Thanks a lot for this, I`m starting to make banners now through this!
_________________
|
|
| Back to top |
|
|
2003041

Joined: 30 Jan 2008
Posts: 1384
Location: MA
|
| Posted: Tue Apr 12, 2011 7:35 am Post subject: |
|
|
I apologize for nagging, but if anyone can tell me the approximate size for the icons, that would be extremely helpful. I'm just guessing that they'd be near the 30-35 pixel mark, but I'd like to know for sure. Thanks again for the icons.
_________________
|
|
| Back to top |
|
|
inv4der


Joined: 16 Sep 2007
Posts: 9658
Location: Meridian, ID
|
| Posted: Tue Apr 12, 2011 7:40 am Post subject: |
|
|
| 2003041 wrote: | | I apologize for nagging, but if anyone can tell me the approximate size for the icons, that would be extremely helpful. I'm just guessing that they'd be near the 30-35 pixel mark, but I'd like to know for sure. Thanks again for the icons. |
I personally have mine at 34x34, but you don't need to copy that exactly.
_________________
|
|
| Back to top |
|
|
uSound
Joined: 24 May 2009
Posts: 1180
Location: Virginia
|
| Posted: Tue Apr 12, 2011 7:41 am Post subject: |
|
|
| 2003041 wrote: | | I apologize for nagging, but if anyone can tell me the approximate size for the icons, that would be extremely helpful. I'm just guessing that they'd be near the 30-35 pixel mark, but I'd like to know for sure. Thanks again for the icons. |
Mine are 34px.
Thanks for asking, I had meant to go back and add that to the tutorial and never got around to it, so I'll do it now! |
|
| Back to top |
|
|
2003041
Joined: 30 Jan 2008
Posts: 1384
Location: MA
|
| Posted: Sun Apr 17, 2011 2:02 am Post subject: |
|
|
Well, I have one problem with the pro keys icon: There is a green background that I cant get rid of. If anyone has a new link for one or just something where I can save it directly to my computer through a link, that'd be great. Thanks in advance.
_________________
|
|
| Back to top |
|
|
ricaluanna

Joined: 17 Jun 2011
Posts: 1
|
| Posted: Fri Jun 17, 2011 1:47 am Post subject: |
|
|
| Thanks!!! This tutorial really helped me in so many ways. |
|
| Back to top |
|
|
Steadysphere

Joined: 27 Mar 2010
Posts: 2064
Location: United Kingdom
|
| Posted: Tue Feb 21, 2012 9:37 pm Post subject: |
|
|
Hey Kevin, I've been using this and your templates to get into banner making recently 
However, something weird is happening. When I resize the icons, it cuts it off slightly.

If you look very closely at the far right (and at the bottom, but you cant see because of the RB3 lettering) it looks cut off. It seems to be happening to the guitar/drum icons specifically, because I have made solo bass/vocals/keys banners and they seem fine. Is it something I'm doing?
_________________
|
|
| Back to top |
|
|
FUGGNUTZ

Joined: 09 Jun 2010
Posts: 63
Location: Illinois
|
| Posted: Sat Mar 17, 2012 4:12 am Post subject: |
|
|
Banner Making Tutorial for Scorehero
Just a video I made to go along with this thread. Sorry for the video lag, I forgot to close some stuff while recording. |
|
| Back to top |
|
|
|