|
|
 |
| View previous topic :: View next topic |
| Author |
Message |
tsukasa2600


Joined: 21 Jun 2008
Posts: 345
Location: University of Dayton, Ohio
|
 Posted: Sat Sep 20, 2008 6:05 am Post subject: Stock drum pad mesh heads mod (updated: 12/15) Posted: Sat Sep 20, 2008 6:05 am Post subject: Stock drum pad mesh heads mod (updated: 12/15) |
 |
|
This mod allows you to use mesh drum heads on a stock drum kit, without the need to make your own rims out of wood.

Note: the sensor is not installed in this image.
Parts list:
- 1/4" dia. Copper tubing, a box of it (enough to make two sets) = ~$20
- 36" x 84" roll of fiberglass mesh (enough to make two sets) = ~$6
- 4x 7" embroidery hoops -- preferably the two-piece wood kind. You only want the inner hoop (smaller than 7") = ~4x$3
- 24x 4-40x1 (what box says) machine screws = ~$1.25
- 24x 4-40 machine nuts = ~$1.25
- 24x 4-40 washers = ~$1.25
- 24x Heavy duty felt pads (optional)
- At least 4 of 4" foam paint brushes
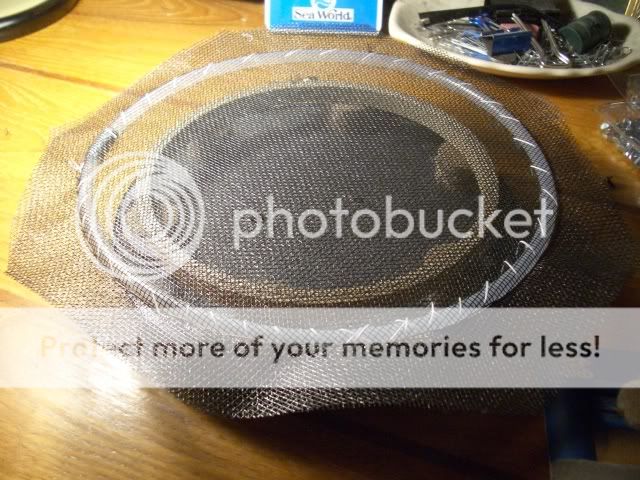
1. Cut copper tubing so that the stock black rim fits completely inside the copper tubing ring. It is rather flexible so bend it so that it fits! Use masking tape to tape the ends together.

2. Sew 2x layered (45 degrees to each other) mesh to copper tubing. It doesn't matter how crappy you sew this part, just sew it so that the mesh will not break apart from the copper tubing. Tautness does not matter at this point.

This is how you should sew it, (staples are shown here, although sewing is recommended)
3. Take the stock pad out, rip out the rubber if you wish. Take out the sensor and set it aside. NOTE: there is glue holding the sensor connector to the drum kit, you'll need to remove it before you can pull the connector out. I scraped mine off with a knife, though I've heard you can dissolve it with rubbing alcohol. Also, be very careful, as it's really easy to rip the wires out.
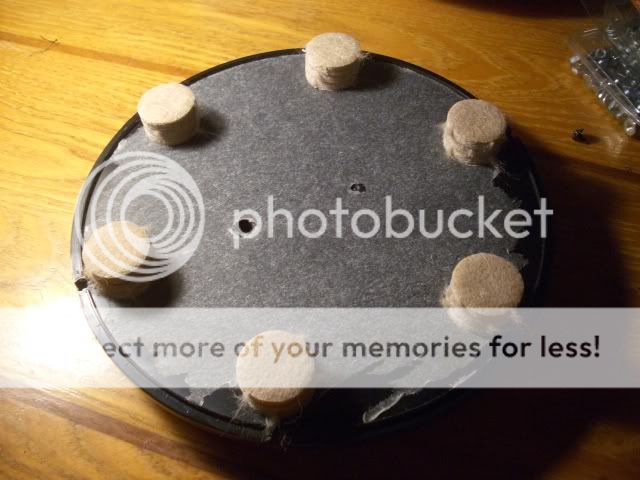
Shown here is the stock pad, minus the rubber, along with some felt pads to raise the embroidery hoop up.
Unscrew the rim from the stock pad. With both the rim and the stock pad attached together (unscrewed), use a drill bit a bit larger than the 40x1 screws you bought and drill into both the rim and the stock pad. I chose a larger drill bit as I did not want to manually screw each of the screws into the rim later -- only had to fasten the washer to the screw.


Also drill a rather large hole onto the stock pad, a quarter of the way down from the top so that you can feed the sensor connector through it.
4. Carefully remove the foam from the brushes. You want it all in one piece. Then cut it into 4 pieces, like this.

5. Stack 2 pieces of foam underneath the sensor,


and 2 pieces on top of the sensor.

6. Sandwich all the parts together like so:

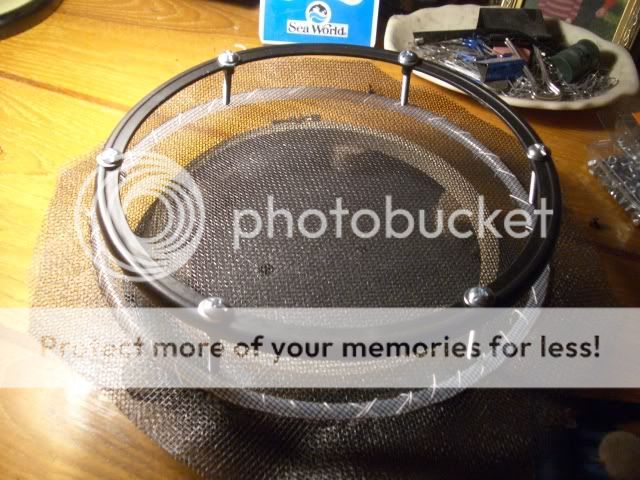
Tighten each screw just a little bit ONE at a time and do not tighten each screw all the way initially.
You're looking for enough tension to have a good amount of rebound, but not too tight, the mesh should feel firm when you push on it, but still have a very small amount of give.
A thanks to the people who made this possible:
mikejl46
russ7166
pkeistler
akwok
(sorry if I forgot anyone!)
Feel free to PM myself or any of these guys if you have any questions
that can't be answered here. 
------------------OLD STUFF-----------------
The original idea for this can be found interspersed throughout here:
http://rockband.scorehero.com/forum/viewtopic.php?t=14720
Just to clarify, the goals of this potential mod are:
Cheap
Easy
Using readily available materials
Does not require access to specialized tools or equipment
Somehow attempts to incorporate the stock drum kit's pads into the design
Update on the stock drums mesh heads idea:
So, I got home and tried just using the mesh with the stock rims and pads with a spacer. It didn't work.
The problem is that there are 6 screw posts on the rim, and this causes wrinkling in the mesh. So I thought that if I just put holes in the mesh, this could be resolved. The next issue is that the stock rims don't tighten down completely, ie. there is a gap between the rim and the head. This allows the mesh to just slip right through = no tension.
Next, I tried to think of ways to tighten the mesh with easily available/store bought materials. The first thought was an embroidery hoop, which has two wooden hoops, one of which fits inside the other, and a screw to tighten the outer hoop. This didn't really work either, it got the mesh tighter than the stock rims and heads, but it couldn't hold the tension. I hit it a couple of times with a drumstick to test the rebound, and it didn't bounce very much, it just got loose.
I did go to the hardware store to pick up some copper tubing, and wasn't able to find anything reasonably priced and appropriately sized that would work as an alternative to hand-made wooden rims.
I'm weary of modifying the drum pads themselves, because then if I screw it up, I'll be without a drum set.
As of right now, I'm burnt out of ideas.
If anyone can think of a good way to do this, I'm open to suggestions.
I'll post pictures to better describe and illustrate the parts of the drum pads later.
_________________
People say that if you play Microsoft CD's backwards, you hear satanic things, but that's nothing, because if you play them forwards, they install Windows.
Last edited by tsukasa2600 on Wed Dec 17, 2008 8:18 pm; edited 10 times in total |
|
| Back to top |
|
 |
Holabano


Joined: 22 Aug 2008
Posts: 97
|
| Posted: Sat Sep 20, 2008 8:12 am Post subject: |
|
|
the key is to 1. buy a separate drum kit and experiment with the old one, 2. tighten the mesh and 3. keep the piezos IN TACT! I've failed miserably at this project so I just bought my goodwoodmods and I'm waiting for them to come in.
_________________
|
|
| Back to top |
|
|
boogie70


Joined: 19 Aug 2008
Posts: 47
Location: California
|
| Posted: Sat Sep 20, 2008 2:51 pm Post subject: |
|
|
Don't know if it would work or not, and the idea would involve "bastardizing" the existing rim...
1. Cut a circle of mesh to fit inside the rim, with enough excess to sew in some small nuts...(ok, this post is going south fast lol) at 12, 3, 6, 9 O'clock positions..or more if needed....
2. Drill holes in the rim for screws to screw down into??? Screws would apparently have to be short to accomodate them popping back onto the existing bases...
Just a thought..... |
|
| Back to top |
|
|
DeanHartley

Joined: 29 Oct 2007
Posts: 308
Location: pa
|
| Posted: Sat Sep 20, 2008 2:55 pm Post subject: |
|
|
I dont think that the stock rims would hold up to all the abuse. lol. Because they can bend and warp and whatnot. But thats my opinion.
_________________
|
|
| Back to top |
|
|
Holabano
Joined: 22 Aug 2008
Posts: 97
|
| Posted: Sat Sep 20, 2008 5:36 pm Post subject: |
|
|
| DeanHartley wrote: | | I dont think that the stock rims would hold up to all the abuse. lol. Because they can bend and warp and whatnot. But thats my opinion. |
that's why you add custom struts!
_________________
|
|
| Back to top |
|
|
russ7166

Joined: 14 Sep 2007
Posts: 328
Location: The REAL Titletown, aka Boston, MA
|
| Posted: Mon Sep 22, 2008 10:52 pm Post subject: |
|
|
I think I have figured out a way that may work. Well, in theory at least. I don't have any materials (ie. mesh) to test out my hypothesis but as long as I can get everything attached securely I don't see why it wouldn't work.
I should have mesh this weekend (I know so long! I don't have a car at the moment so no Home Depot trips for me this week  ) which is when I'll post everything up with pictures and what not if I am indeed successful. ) which is when I'll post everything up with pictures and what not if I am indeed successful.
:] |
|
| Back to top |
|
|
tsukasa2600
Joined: 21 Jun 2008
Posts: 345
Location: University of Dayton, Ohio
|
| Posted: Tue Sep 23, 2008 2:54 am Post subject: |
|
|
That's good to hear! I was beginning to get discouraged, as I haven't been able to come up with any other ideas as to how to do it...
Looking forward to hearing from you!!
_________________
People say that if you play Microsoft CD's backwards, you hear satanic things, but that's nothing, because if you play them forwards, they install Windows. |
|
| Back to top |
|
|
mikejl46

Joined: 13 Jun 2008
Posts: 238
|
| Posted: Tue Sep 23, 2008 3:56 pm Post subject: |
|
|
Maybe something simple like this may work. Add plastic so you have a place to put the mesh head.

You could drill small holes in the copper and use small screws to tighten down. You would need to add some sort of lug for tightening

Its a start to something very cheap and simple.
_________________
|
|
| Back to top |
|
|
tsukasa2600
Joined: 21 Jun 2008
Posts: 345
Location: University of Dayton, Ohio
|
| Posted: Tue Sep 23, 2008 7:21 pm Post subject: |
|
|
Nice, I like it!
But what do we use for the rims?
When I was at home depot last weekend, they didn't have any small turnbuckles. So it needs a way to tighten it as well.
Also, the buckets they had were a bit on the expensive side, and I was thinking of something that is already the right diameter, since I don't have access to a riveter. I was thinking a gallon paint can.
I don't quite understand what you mean by the small holes in the copper tightened with screws...
It's a start, for sure, and a great one at that. I wish I had brought my drums back with me so I could experiment.
Still looking forward to russ's idea as well.
Also, it might be useful if someone could post the inner diameters of both the drum base and the rim.
Edit: Mike, wouldn't you want to line the edge of the bucket with some vinyl tubing or something so that it doesn't cut the mesh?
_________________
People say that if you play Microsoft CD's backwards, you hear satanic things, but that's nothing, because if you play them forwards, they install Windows. |
|
| Back to top |
|
|
russ7166
Joined: 14 Sep 2007
Posts: 328
Location: The REAL Titletown, aka Boston, MA
|
| Posted: Tue Sep 23, 2008 7:29 pm Post subject: |
|
|
When the mesh head is made if there are any extra holes (like for screws) will that mess up the tightness of the mesh? I was thinking that if there were holes in the mesh that it would create a weak spot that, when the mesh is hit repeatedly, would start to rip at that point and eventually tear the mesh apart.
Am I right?
:] |
|
| Back to top |
|
|
pkeistler


Joined: 11 Feb 2007
Posts: 155
Location: North Carolina
|
| Posted: Tue Sep 23, 2008 10:29 pm Post subject: |
|
|
I don't know man, that fiberglass stuff is pretty tough, lol.
My interest has kind of peaked in this type of stuff now that I have two drum sets. I made half an attempt at this a couple of months back and I though I'd share some of the things I learned.
Like the OP, I tried the cross stitch hoops with the fiberglass screen. They were the 8" ones. What I did was superglue the screen loosely to the outside ring, and then pressed it against the inside ring, and superglued that in place. It actually turned out really tight, and worked well by itself. For the sensors, I simply took some thread and sewed them directly to the back of the mesh, near the edge rather than in the center, so as not to hit them directly.
This actually worked awesome when I was holding it in the air, but the problem was with the way I attached it to the kit. I just used some zip ties and what not. Then of course the problem came up, mondo cross talk. Lesson learned: The actual heads that you hit need to be somewhat isolated from the kit. The stock pads float on some foam, with those rubber grommets to keep them from falling off.
That being said, I would seriously recommend against hard mounting anything directly to the kit.
And I think I just had an idea. What if you did the cross stitch hoop thing, with the superglue to get it tight, then just mounted that to the existing drum heads. Just take the sensor off the old drum head and route it to the back of the mesh head...
I might have to try that out. Of course I'm going to need some new hoops. I pretty much destroyed those old ones when they didn't work.
By the way, 8" is to big for them to fit directly over the stock drum heads without overlapping.
Edit: I found a picture I took while I was making it. At this point I was gluing it to the outer ring. Once that set, I pressed the inner ring in and glued it.
 |
|
| Back to top |
|
|
tsukasa2600
Joined: 21 Jun 2008
Posts: 345
Location: University of Dayton, Ohio
|
| Posted: Tue Sep 23, 2008 11:08 pm Post subject: |
|
|
So you were able to get the cross stitch hoops to work?
Maybe the hoops I was using were too flimsy. (Cheap thin wood ones)
If you go the hoop route, and are mounting the hoops directly on top of the stock pads, I think, ideally, you'd want some sort of spacer to increase the amount of space between the mesh and the pad, so that way there would be enough room to mount the foam and piezo.
I may have another chance to work on it this weekend, I'll be less worried about damaging the stock heads, now that I have my trusty tube of bondo at my side. 
Also, if cross-talk is an issue for mounting directly to the drum base, I think a couple of layers of craft foam ought to completely eliminate the problem.
_________________
People say that if you play Microsoft CD's backwards, you hear satanic things, but that's nothing, because if you play them forwards, they install Windows. |
|
| Back to top |
|
|
mikejl46
Joined: 13 Jun 2008
Posts: 238
|
| Posted: Wed Sep 24, 2008 1:01 am Post subject: |
|
|
| tsukasa2600 wrote: | Nice, I like it!
But what do we use for the rims?
When I was at home depot last weekend, they didn't have any small turnbuckles. So it needs a way to tighten it as well.
Also, the buckets they had were a bit on the expensive side, and I was thinking of something that is already the right diameter, since I don't have access to a riveter. I was thinking a gallon paint can.
I don't quite understand what you mean by the small holes in the copper tightened with screws...
It's a start, for sure, and a great one at that. I wish I had brought my drums back with me so I could experiment.
Still looking forward to russ's idea as well.
Also, it might be useful if someone could post the inner diameters of both the drum base and the rim.
Edit: Mike, wouldn't you want to line the edge of the bucket with some vinyl tubing or something so that it doesn't cut the mesh? |
I haven't tried it yet, but I was thinking just to keep it real simple. Use the copper as the rim and hoop at the same time.
I can get about five 2" tall drums out of one $3.39 bucket.
The problem with using a hoop doing it this way is there is hardly any space between the drums. There is so little space the copper tubing on each drum would be touching each other.
I have used vinly tubing before when the edges where kind of ruff.
_________________
|
|
| Back to top |
|
|
russ7166
Joined: 14 Sep 2007
Posts: 328
Location: The REAL Titletown, aka Boston, MA
|
| Posted: Wed Sep 24, 2008 1:10 am Post subject: |
|
|
| tsukasa2600 wrote: | | Also, if cross-talk is an issue for mounting directly to the drum base, I think a couple of layers of craft foam ought to completely eliminate the problem. |
Yes but if you do mount the heads directly to the drum base you are going to have a MASSIVE amount of vibration and rattling. I think the best way to do it would to keep it separate from the base with the rubber nobs somehow connected.
The other problem with having it mounted on the base is that since the pad isn't rebounding as it would if it were floating all that force you put into a hit will go right to that bridge connecting the green pad to the blue and the red pad to the yellow.
I'm not completely positive on this but I mean if you think about it it would seem that way. I could be wrong though 
:] |
|
| Back to top |
|
|
pkeistler
Joined: 11 Feb 2007
Posts: 155
Location: North Carolina
|
| Posted: Wed Sep 24, 2008 1:23 am Post subject: |
|
|
Well, I used some foam rubber stuff, and that didn't help with the crosstalk, but that also depends on how the piezo is connected to the mesh.
On mine, I had the piezo attached directly to the bottom of the mesh. That worked perfectly, minus the crosstalk. No need for foam clearance in that situation either.
By the way, yes, they were the thin cheap ones, but when they're mounted solidly, they are pretty strong. |
|
| Back to top |
|
|
|
|
You cannot post new topics in this forum
You cannot reply to topics in this forum
You cannot edit your posts in this forum
You cannot delete your posts in this forum
You cannot vote in polls in this forum
|
Copyright © 2006-2024 ScoreHero, LLC
|
Powered by phpBB
|